Ad Configurations
Set up audience types, targeting, locations, CTAs, and lead forms once per workspace so every playbook deploys with the right settings automatically.
Ad Configuration holds each workspace's targeting: audience types, radius, custom audiences, call-to-action URLs, and lead forms. Playbooks pull these settings when they deploy, so there is no per-campaign setup. Set it up once and keep the status dots green.
The examples follow Paul's Yoga Studio, one location getting ready to launch playbooks.
Who sets what
Hub admins create the audience types and set the network-wide Default baseline, and can lock fields so every location stays on brand. Workspace owners fill in their own location, radius, CTA, and lead form. Whether a workspace can edit these fields depends on its Paid Ads Management permission (see Permissions below).
How The Table Is Organized
Open it directly at studio.flamel.ai/paid/configuration, or from the sidebar under Social Media Ads > Configuration. The page has three parts:
- Tabs across the top:
Defaultplus one tab per audience type. - A status dot on each tab: green means the location is set, red means it is missing. A red dot blocks deployment for that audience type.
- Collapsible sections within each tab (Demographics, Custom Audiences, Custom Locations, Call to Action, Lead Capture, and more).
The Default tab is the targeting an ad set uses when it picks Default. Every other tab is a complete targeting package of its own: an ad set that picks it uses that tab's demographics, audiences, and locations as they are, and blank targeting fields stay blank. Only the call to action (Website URL, Display URL, Lead Form, Messenger Template) falls back to Default when a tab leaves it empty.
Hub Admins: Create Audience Types And The Default Baseline
Create the audience types you will use
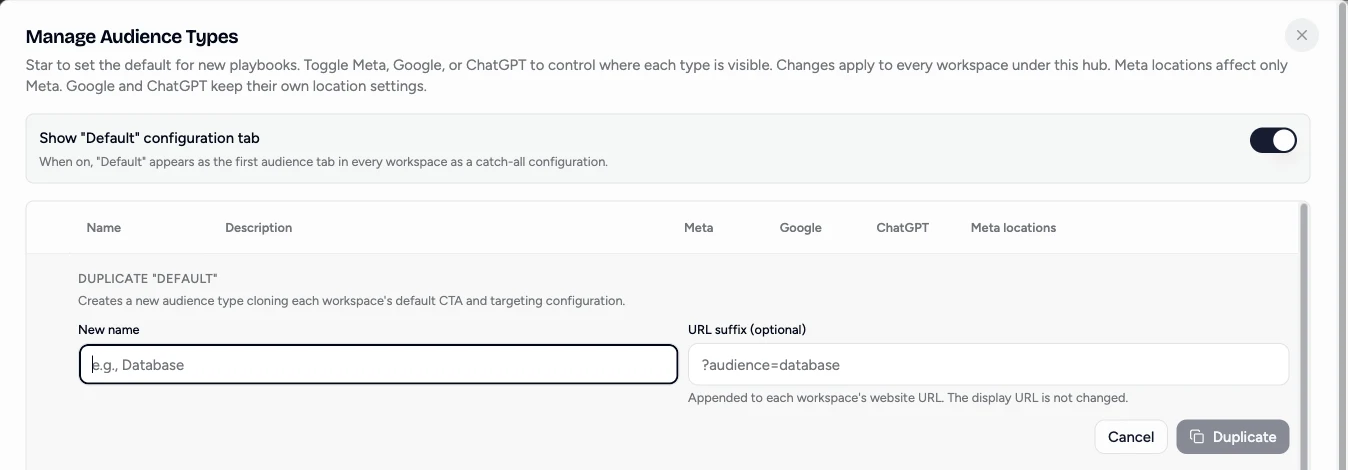
Click Manage Audience Types next to the audience tabs. Name them by strategy (for example Core Customer, Lookalike, 90 Day Website Visitors), never generically (avoid Type 1, Test). Add a one-line description, since workspaces see it when they pick an audience. Start with 2 to 3 types: each new one adds setup work for every workspace.
To copy your current setup into a new type, click the Duplicate (copy) icon on the Default row. Every type's row has one, so you can also copy an existing type. Flamel copies each workspace's Default targeting and call to action into the new type. The optional URL suffix, such as ?audience=membership, is added to each workspace's Website URL. See Build an Audience Strategy for how to structure your types.
Configure the Default tab
The Default tab is your evergreen targeting, used by every ad set that picks Default. Fill in each section: Demographics, Custom Audiences, Languages, Advanced Targeting, Custom Locations (or Cities / Zip Codes / Countries), Call to Action, and Lead Capture.
Keep Default broad
Most ad sets use Default, so its age range and audiences shape most campaigns in the network. Keep the age range wide, and keep retargeting audiences such as website visitors off Default. Give retargeting its own audience type so only the ad sets that choose it are narrowed.
Build each audience type as a full package
An ad set uses one tab on its own, so fill in every targeting field the strategy needs. Typical examples:
- Core / ideal customer: your default segment, built from the demographics, locations, and interests of the customer you most want to reach.
- Lookalike: a 1 to 3 percent lookalike that finds new people who resemble your existing customers.
- Retargeting: a pixel-based audience of people who already visited your site or engaged with you.
Set the per-workspace row
For each workspace, complete its location, audience, URL, and lead-form values. This is the main onboarding step for a new franchisee, and it is the same flow a workspace owner follows below.
When to Enable Advantage+
Advantage+ is Meta's AI-driven targeting that expands beyond your defined audiences.
- Enable it when the objective is conversions, when you want Meta to expand beyond your audiences, or when you are testing new markets.
- Skip it when you have strict geographic requirements, when the campaign is a special category (housing, credit, employment), or when you have a small, well-defined audience you do not want to dilute.
Target a Meta Saved Audience
A saved audience is an audience you built and named in Meta Ads Manager. Point an audience type at one when Meta already holds the targeting you want and you would rather not rebuild it field by field in Flamel.
Open Social Media Ads, then Configuration, pick the tab you want, and expand Saved Audience. Choose one of the audiences Flamel synced from that workspace's Meta ad account and it appears with its name and Meta id. Click Sync Saved Audiences first if the one you need is missing. The X beside a selected audience removes it, and the section reads No saved audience when nothing is set.
At launch the saved audience replaces the age range, gender, and detailed targeting on that tab. Flamel keeps the geography, the languages, and the Advantage+ setting, and it merges your custom audiences with the saved audience's own. A saved audience decides who sees the ad. Flamel still decides where.
A stale saved audience stops the launch
Flamel reads the audience from Meta every time it launches an ad set, so a bad selection never quietly falls back to broader targeting. When the audience was deleted, cannot be read, belongs to a different ad account, or carries no targeting, that workspace's deploy fails with a named error. Sync and reselect the audience, or remove it from the tab.
Recruitment audience types have no Saved Audience section, because Meta's employment ad rules do not let an employment ad narrow by age, gender, or interests.
Two Ways to Set Location Targeting
Every audience type needs a location before it can deploy. You can set that location in one of two ways, and you choose per audience type with the Use workspace locations switch.
| Option | Where the geography comes from | Best for |
|---|---|---|
| Custom Locations (switch off) | An address and radius saved on this audience type only. | A workspace with one studio, or an audience type that needs its own area. |
| Workspace Locations (switch on) | The workspace's shared list of studios, radii, ZIP code territories, and excluded areas. | Brands with several studios per workspace, or a location list you keep in a Google Sheet. |
Workspace Locations can sync from a Google Sheet. Share your location sheet with Flamel as a Viewer and Flamel reads it daily, adding and updating studios for you while keeping every change you make in Flamel. See Locations for Ad Targeting for setup, sheet sync, and how to update ads that are already running.
Set Up a Workspace, Step By Step
Paul follows these steps to get his studio ready to launch.
Before you start
Confirm your Meta ad account and Facebook Page are connected in Connected Accounts. Ad Configuration only works on a connected workspace.
Set your location first
Open the Default tab, expand Custom Locations, and add your business address with a radius suited to your market: 5 to 10 miles for urban, 15 to 25 for suburban, 25 to 50 for rural. This is required before any campaign can deploy.
Paul adds his studio address with a 10 mile radius.
If the audience type uses Workspace Locations instead, turn on Use workspace locations and manage the studios in Locations for Ad Targeting.
Location is required
Every audience tab needs a valid location before campaigns launch. If a tab still shows a red dot, finish its location before you opt into a playbook.
Set Demographics
Set the Age Min / Max (13 to 65) and Gender (All, Men, or Women). Start wide and narrow only when a playbook calls for it.
Paul sets 18 to 55, all genders.
Sync and pick Custom Audiences
Under Custom Audiences, click Sync Audiences to pull the latest lists from Meta (based on the workspace's Facebook Page), then include or exclude the relevant ones. On Default, use broad audiences such as lookalikes, plus exclusions such as current members. Keep website-visitor retargeting for its own audience type.
Paul includes his website-visitor lookalike.
Fill in the Call to Action
Paste the destination page in Website URL. If you want a different visible link, set the Display URL.
Paul uses paulsyogastudio.com/join as the destination and paulsyogastudio.com as the display URL.
Attach a lead form (if needed)
If the playbook uses lead generation, open Lead Capture, click Sync Forms, and pick the correct Meta Instant Form. For Messenger-objective playbooks, select the Messenger Template too.
Paul picks his "Free Class Pass" form.
Fill in the rest as needed
Complete the optional sections only if your strategy uses them: Languages (locale targeting), Advanced Targeting (interests and behaviors, used sparingly since over-targeting shrinks reach), and Cities / Zip Codes / Countries (alternative location fields most workspaces skip in favor of Custom Locations).
Review each audience tab
Open each remaining audience tab and confirm its targeting is complete for this location, because a tab does not borrow targeting from Default. Paul's Lookalike tab has his studio radius and a wider age range.
Confirm every tab is green
Check that every tab shows a green status dot. A red dot means Custom Locations is missing for that audience type, and its campaigns will not deploy until you fix it.
Save behavior
Most sections autosave when you click away. Custom Locations sometimes needs an explicit save. Refresh the page after large changes to confirm everything persisted.
Field Reference
| Section | What it does |
|---|---|
| Demographics | Age Min / Max accepts 13 to 65. Gender is All, Men, or Women. Start wide; narrow only when a playbook targets a tighter range. |
| Custom Audiences | Include or exclude Meta custom audiences (CRM uploads, lookalikes, website visitors). Click Sync Audiences to pull the latest from Meta. |
| Saved Audience | Point this tab at a Meta saved audience. At launch it replaces the age range, gender, and detailed targeting, merges custom audiences, and leaves geography, languages, and Advantage+ to Flamel. Click Sync Saved Audiences if yours is missing. Not available on Recruitment audience types. |
| Languages | Locale targeting. Leave empty to reach all languages spoken in your targeted locations. |
| Advanced Targeting | Interests, behaviors, income, education, employers. Use sparingly; over-targeting shrinks reach and raises cost per click. |
| Custom Locations | Address or latitude/longitude plus radius. Required for campaigns to deploy. Use a market-appropriate radius (5 to 10 mi urban, 15 to 25 suburban, 25 to 50 rural). |
| Cities, Zip Codes, Countries | Alternative location-targeting fields. Most workspaces use Custom Locations instead. |
| Use workspace locations | Targets the workspace's shared Locations instead of this audience type's own geography. Locations can sync from a Google Sheet. See Locations for Ad Targeting. |
| Call to Action | Website URL is the destination page for Traffic and Conversion ads. Display URL is the link text shown inside the ad and may differ from Website URL. |
| Lead Capture | Lead Form picks from synced Meta Instant Forms (click Sync Forms if yours is missing). Messenger Template is required for Messenger-objective playbooks. |
What Falls Back to Default
Targeting never mixes tabs: an ad set uses exactly the tab it selects. The Call to Action is the exception. It resolves in this order: the audience-type CTA, then the Default tab CTA, then the workspace's Website URL in Workspace Variables.
A playbook can replace this destination for its own ads. When an ad has a Destination URL, or the playbook has a Landing page URL, that address is used instead of the workspace's Website URL, and the ad's visible link matches it. Use this for a campaign landing page instead of changing every workspace's configuration. See Choose Where Ads Send People for the full order.
Status Indicators
| Indicator | Meaning | Action |
|---|---|---|
| Green dot on tab | Location set | None |
| Red dot on tab | Location missing | Set Custom Locations or campaigns will fail to deploy |
Permissions
| Action | Hub | Workspace |
|---|---|---|
| Create / delete audience types | Yes | No |
| Edit Hub-locked fields | Yes | No |
| Adjust radius, CTAs, lead forms | Yes | Yes* |
| Sync audiences and forms | Yes | Yes* |
*Workspace access depends on the Paid Ads Management permission. To set it as a Hub admin, open your profile at the bottom left, select Hub, then Permissions, and enable or disable Paid Ads Management per user. Workspace edits to non-locked fields persist normally; Hub-locked fields appear read-only on the workspace side.
Common Fixes
- Location keeps reverting: make sure you saved the Custom Locations section.
- A tab shows a red dot: Custom Locations is missing for that audience type. Set it before opting into a playbook.
- Lead form is missing: click Sync Forms and confirm the form is published in Meta.
- A deploy failed on a saved audience: the audience was deleted, moved, or belongs to another ad account. Click Sync Saved Audiences, reselect it, or remove it from the tab.
- Audience tabs are missing: ask your Hub admin to confirm they created them.
- Need more control as a workspace: ask your Hub admin to enable Paid Ads Management for your user.
Related Articles
Structure audience types for evergreen, retargeting, and promotion campaigns.
Target every studio from one shared list, synced from your Google Sheet.
Create and sync Meta Instant Forms before wiring them in Ad Configuration.
The campaigns that deploy using the settings you configure here.
Location fields like radius and website URL that feed into ad targeting.