Message Templates
Author one Click-to-Messenger welcome experience, apply it to every location's configuration, and let messaging playbooks deploy it automatically.
A Click-to-Messenger ad opens a chat instead of a landing page. What the customer sees in that first message is the message template.
You write it once at the Hub, apply it to each location's configuration, and every messaging playbook that inherits picks it up automatically. No franchisee has to author a greeting.
Hubs build this welcome message inside Flamel, not in Meta Business Suite. You write a greeting, add conversation starters that a customer can tap, and add an optional button to your website.
Open Social Media Ads, then Configuration, then Manage, then Build message templates.
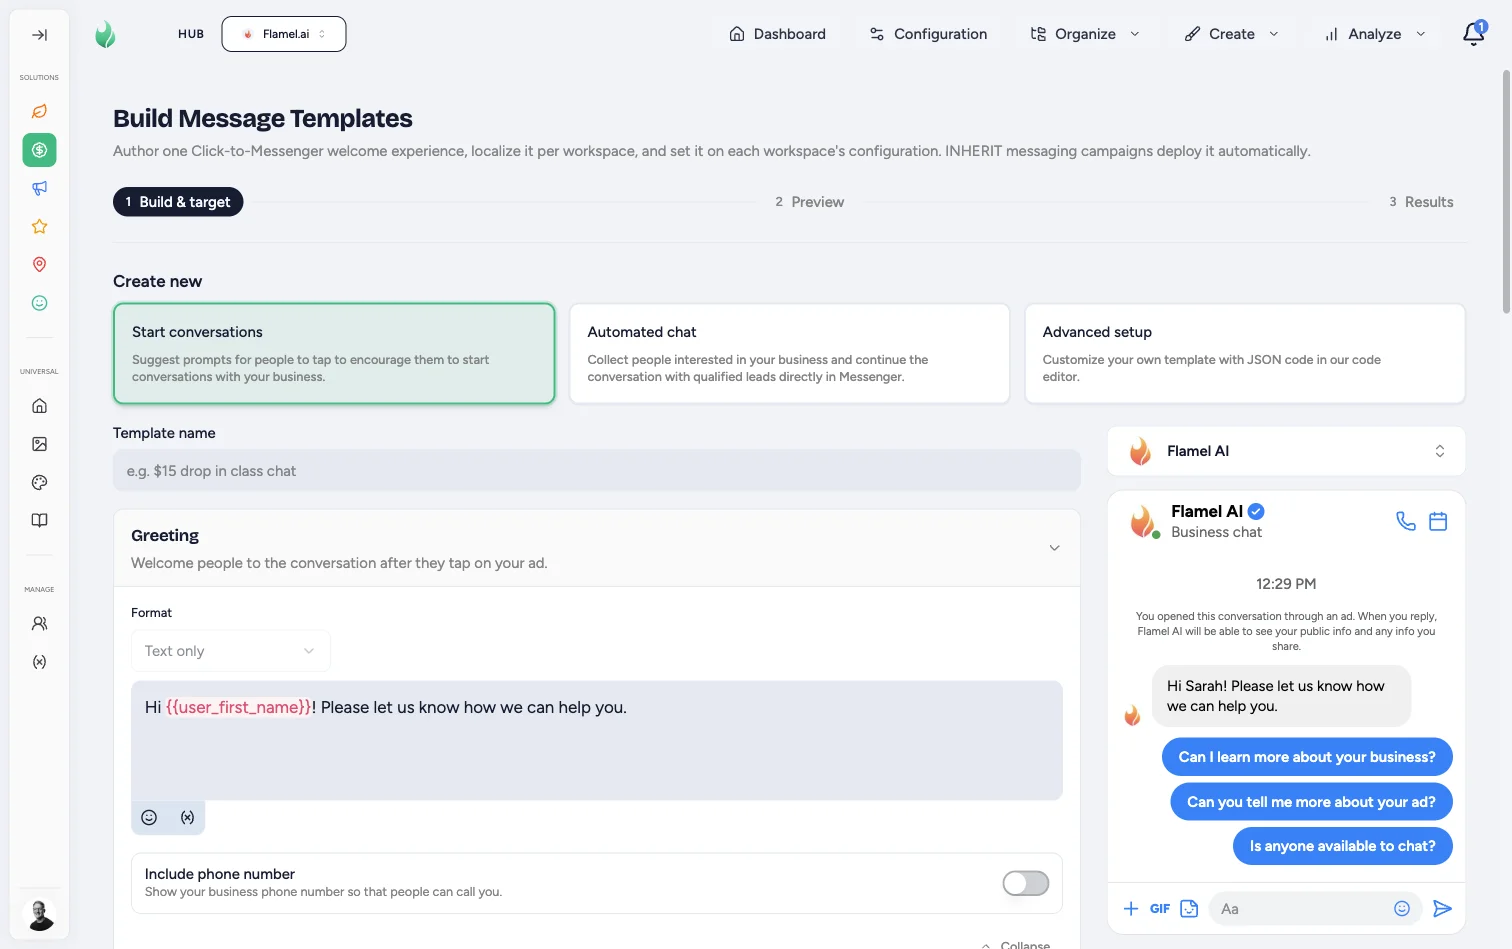
The builder runs in three stages across the top: Build & target, Preview, then Results.
A live Messenger preview sits beside the editor from the moment the page opens. It shows what a customer sees before you build anything, so you can judge every change as you make it.
Pick a Path
Start Conversations
The default, and the right choice for most locations. You write a greeting and suggest up to five taps: frequently asked questions, quick replies, or a button to your site.
Best when you want volume at the top of the funnel and a human will answer.
Automated Chat
Everything above, plus lead qualification inside Messenger: a privacy policy, a reminder message, and tracking parameters.
Best when you want qualified leads rather than raw conversations, and nobody is watching the inbox all day.
Build branching flows in Meta Business Suite
Meta retired the way outside tools create branching lead forms. Do not build a branching flow here and expect it to reach your ads.
Author the branching form in Meta Business Suite instead. Then sync it into Flamel and select it for each workspace, as described in Choose a Synced Form below.
Advanced Setup
Paste version 2 message-template JSON directly and load it into the editor.
Reach for it only when you are copying a template that already exists in Meta, or need something the visual editor will not express.
Write the Greeting
Name the template, then write the greeting people see after they tap your ad.
Use {{user_first_name}} to personalize it. The preview on the right renders exactly what the customer sees, including your quick-reply buttons, as you type.
Under Customer actions, add the taps you want to offer: frequently asked questions, quick replies, or a button that sends people to your website.
Turn on Include phone number if you want people to be able to call instead of chat. Add a Follow-up message to nudge high-intent people who tapped but never sent anything after about a day.
Use Workspace Variables
One greeting must read correctly for every location, so write it with variables instead of fixed text.
Click Insert variable and pick the value you want. Each location fills in its own workspace name, city, phone number, and website when the ad deploys.
Use the workspace selector above the preview to load one location's real data. The preview then shows that location's greeting. Every other location gets its own values at deploy.
See Variables for the full list and how workspace data is kept current.
Apply It to Every Location
This is the step that makes it real. A template that is not applied does nothing.
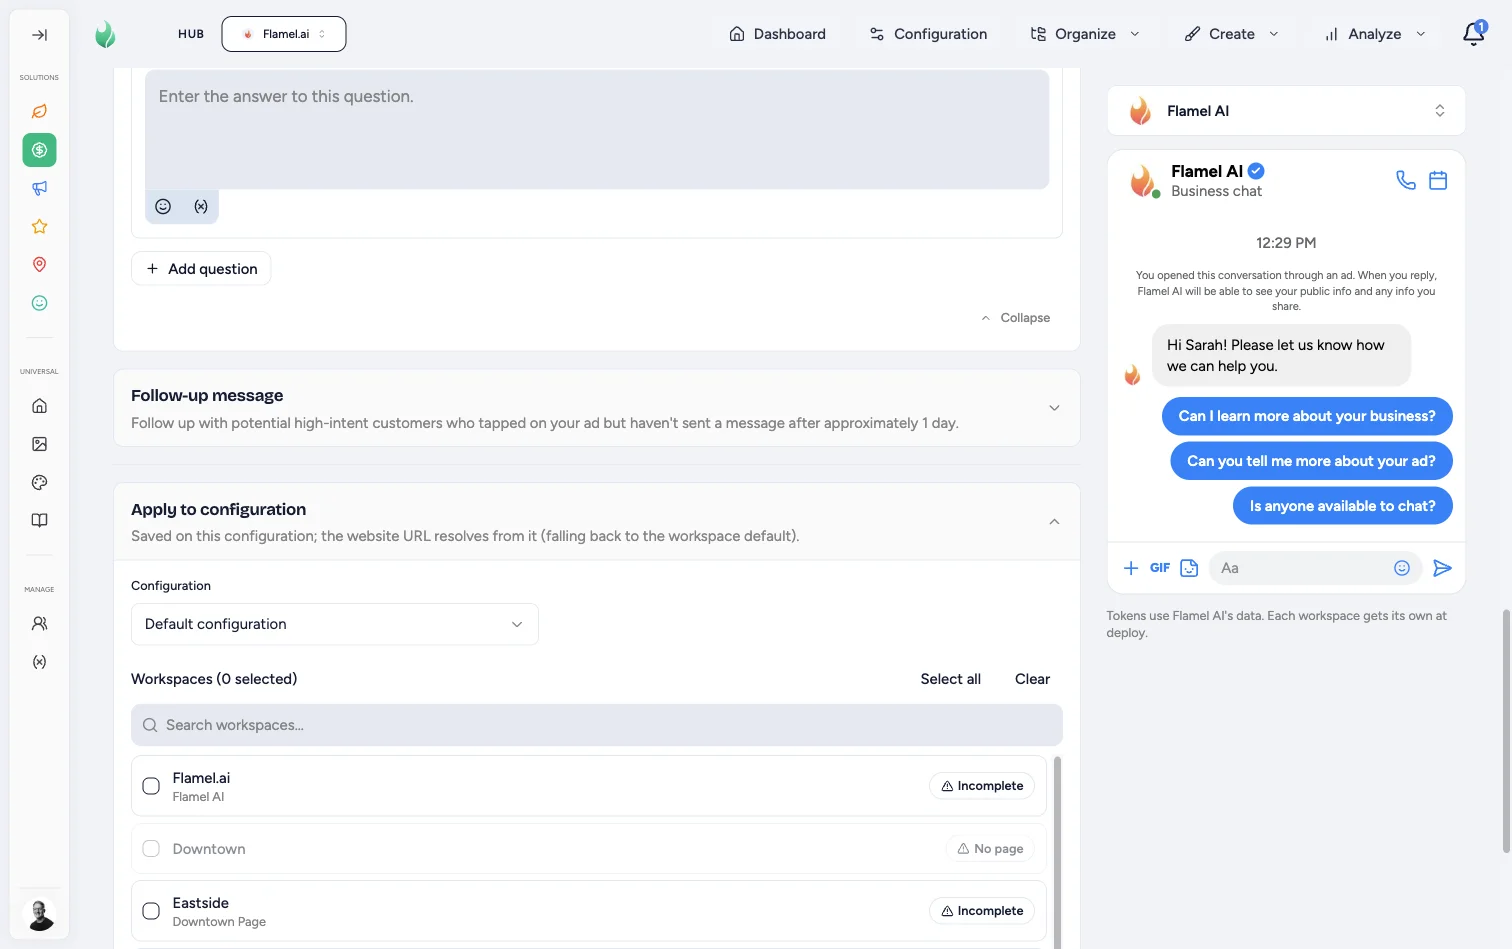
Choose the Configuration
Pick which audience configuration the template attaches to. The website URL resolves from it and falls back to the workspace default.
Select Locations
Check the locations to apply it to, or use Select all.
Watch the badges. No page means that location has no connected Facebook page and cannot run messaging ads at all. Incomplete means its configuration still has gaps. Fix those before you launch, not after.
Preview Every Location
Click Preview. Flamel localizes the template for each location you selected and shows a separate Messenger preview for each one.
Read the badge on each card. Ready means the location can receive the template. Incomplete means fields are still missing, and the tooltip names them.
Save and Verify
Click Set on configuration. Each location gets its own localized copy on its Meta configuration.
To confirm, open Configuration, pick that workspace, and check that the welcome message is set.
Choose a Synced Form
A message template that already lives in Meta can be used instead of a Flamel welcome message. Branching flows always take this route.
Sync the Forms
Open Configuration and find the workspace. Under Message Template, click the refresh button to sync. Flamel pulls in the message templates that live on that workspace's Facebook page.
Select and Preview
Pick the form you want for that workspace. A chat preview opens under the picker, so you can read the whole flow before anything goes live.
A synced form wins over a welcome message
A selected Message Template takes precedence on messaging ads. If a workspace has both, the welcome message does not deploy. Clear the Message Template to use the welcome message instead.
Use It in a Playbook
Create a playbook with the Engagement objective, then choose Message Destinations as the conversion location.
Campaigns set to inherit deploy with the template already attached, so each location launches with its own localized greeting and no extra work. Franchisees can still rewrite their greeting and quick replies during opt-in if you allow it.
See Engagement Playbooks and Messaging Ads for the full campaign walkthrough. For lead forms that open from a link ad instead of a chat, see Lead Forms.